So, my first blog post. If you’re reading this, you’re probably looking at the picture above and wondering, “What the hell is that?”.
Well, this will be the first project of my blog. I desperately need to continue with this project because it’s been sitting in my living room for almost 3 years, from when I first started it until now. I started it with great passion. Much enthusiasm. I had such determination to finish it and once I got about 45% finished, I just stopped. I started a new project. And that’s what happens. I begin a project super excited and then that enthusiasm fizzles out. It’s the creative process that I love, I suppose. I love coming up with new ideas, thinking the process through or not. Sketching ideas. It’s all exciting.
This project, however, I’ve put it off for far too long and I’m ready to get back to it.
Since this project is a little bit more far along, I’ll just give a pretty generic overview of my process. And perhaps since it doesn’t look like very much yet, maybe even explain what this is going to be? Or maybe I’ll wait for that until the end, so you can all be surprised! Haha. Yes, I think that’s exactly what I will do.
My first steps were to create an armature. What that means is that I made a metal framework for my sculpture. In case I didn’t mention it, this first project is a sculpture. Armatures are typically used for clay but in this instance, we are using plaster, completely skipping the clay process, which may or may not have been a bad idea, I haven’t quite decided. Yet, it is the way I chose to execute this project. And since I’m convincing myself that there is no right or wrong way to make art… well… I guess the idea of that is up for debate. But I am definitely leaning on the side that says there are many ways to peel an orange. (Not even going to try to talk my way around the cat metaphor… I’m sure you all know what I mean.)
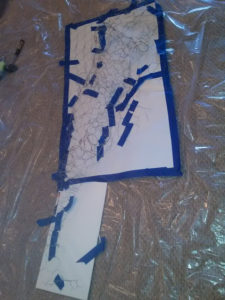
I built this armature. It doesn’t look like much from the photo but it actually took me a little while. I used chicken wire, which anyone can purchase from any home improvement type of store, like Lowe’s or Home Depot, or any other such store. I shaped the wire using my own two hands and various parts of my body that I needed for extra support and shaping. The paper under the wire is there mainly so I can see the chicken wire and not have it blend right in with the floor and also there are slight markings on it for scaling purposes. And the blue tape is keeping the wire in place. If you’ve ever tried using chicken wire, you will notice that it is very light, very bendy, and so it may not want to stay in the spot that you put it without a little physical coercion. That’s the main reason I used painter’s tape to secure it to my paper and keep it in the position that I wanted.
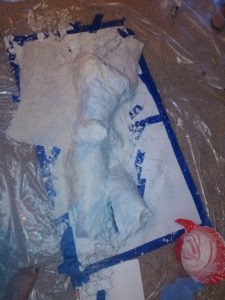
After completing the armature, I mixed my plaster and over strips of very cheap cloth, began the process of layering it on and shaping my figure. Stay tuned for a post regarding plastering techniques maybe the next time I need to make plaster. I would like to state for the record that although I have a degree in sculpture, I am by no means, the be-all and end-all as far as art is concerned. And as a matter of fact, there is so much knowledge that I learned in college that I just don’t remember and perhaps even mixed up with other techniques, that really when I’m making art and other crafty things, it’s really about trial and error and seeing what you end up with because you could start out with the best intentions and still have your project fall apart. I’ve learned that a time or two.
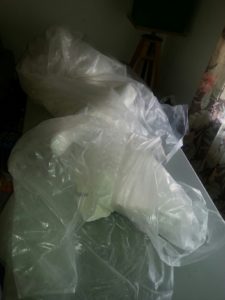
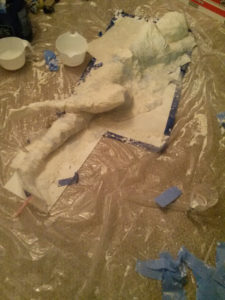
And finally, the figure with about 75% of its plaster applied to it. Always taking care to work on the plastic, since my own personal art studio space at the moment is my living room floor. I know this blog is called Jenny’s Art Closet, but my actual art closet is not big enough to work in. In fact, it’s only large enough to hold my supplies and other random stuff and actually finished works. Side note, I pondered turning it into a reading nook. I thought that would be awesome. And yet, my wife reminded me that if I removed my art supplies from my art closet, that they would have nowhere to go, and it would no longer actually be my art closet. So I quickly let that idea fall by the wayside. Someday! Someday, I say, I shall move into a bigger place, and make a project out of creating a reading nook. For now, we will continue with one project at a time, or maybe two or three projects, as long as I keep working on them, stop procrastinating and finally complete them.
And those phases were completed so very long ago. It almost breaks my heart what a terrible procrastinator I am. However, since I am making honest efforts towards not continuing those patterns, I will not let these sad thoughts of my poor sculpture so unfinished unnerve me! I will take those feelings and move forward! After all, it’s not like I was sitting on my arse all this time, just watching the sculpture and laughing at it while I sat on the couch doing nothing but eating chips. I was making stuff. I wish I had started this blog when I was planning my wedding. There’s so much that I made myself that I could have shown other people how I did it and let that out there into the world. But then this blog would have turned into a wedding type of blog and I loved reading those when I was planning, but now that I’m not, it’s a theme that would have gotten really old for me. But I digress. A lot actually, and so much so that I really hope you’ve made it to the end of this post as this final photo is my sculpture hanging out in the corner of my living room, untouched for a long time now. So let’s get back to it.

I plan on updating in a couple of weeks once I actually have some progress to show, on either this piece or a new project that I am in the midst of pondering… Until then, good luck doing whatever it is that makes you happy!
You’re a great writer; this post was a pleasure to read. I’m not an artist by any stretch of the imagination but I do love to craft on occasion. Best of luck on your endeavors and I’ve subscribed so, hoping to see progress soon.
Thank you so much! I will definitely post progress as much as I can and on as many of the projects that I work on as I can! Stay tuned!
Great job to my sister Jenny .I know it will be a beautiful master piece and I can’tell wait to see the finish product.I have all confidence that it will be a priceless piece of art.Keep us posted!!!!
Thanks, Rohini! So glad you liked it! I will definitely keep you posted!
Me hiciste reir con tu material “chicken wire” alambre para gallinas, in spanish we tell malla metalica literal translation: Metal Network.
Jahir, gracias por tu comentario!
Chicken wire, although used to keep chickens inside fences in farms, is not a typical art medium, that I know of. But artists use whatever resources they have that will serve their purpose. I first used chicken wire in college when I made a wire frame mermaid. It was a highlight of the first year of my college career. Chicken wire created more surface and was very easy to work with. Anyone working on this may have chosen another medium for their armature. Newspaper perhaps. You could gather balled up newspaper and shape plaster or clay over it and dispose of the newspaper when you’re finished. But plaster that’s a thin layer will not be very sturdy. The chicken wire provides extra support, which it will definitely need in its final stages. ¡Estoy feliz que lo has leído!